Saturday, August 6, 2011

Spontaneous Key Largo Trip

This morning, my dad announced that we were taking a trip down to Key Largo for a few days this weekend. I love when he does stuff like that. It made me really happy, because we didn't get to take any vacations this summer; I've pretty much been stuck at home the whole time. Plus, dad wants me to get in driving practice (since I just got my permit some weeks ago). I drove half the way there, and I'll probably be driving half the way back too. I dislike long car rides because I hate sitting still, but I don't mind so much I guess; four hours isn't that bad. I'll work on this blog post while I'm not behind the wheel. (-:

Dad took a picture of me driving--without me being aware of it, of course.


When we made a rest stop halfway to do a change-over, I took a picture of some blackbirds. They had feathers that shone that pretty midnight-blue color. My youngest sister started feeding them cracker crumbs, and a bunch of them flocked over to our car.


By the time we reached Key Largo tonight, it was around eight. It took us a bit to find a place to stay with rooms available, and all the good places were full (by good I don't mean expensive resorts and such, I just mean the good lower-priced hotels and motels) but we managed to find a vacancy at a Marriott Inn--although just barely; it was the last room they had left! I guess, even though the mini lobster season is over, it's still pretty busy down here this weekend.

It was past nine by the time we went out to eat, but this isn't North Port, where everything is sleeping by eight-thirty, so of course it was fine. We went to our favorite restaurant here, the Fish House. We love it because the fish is always SUPER fresh, which is the ONLY way to eat fish. Ordering wasn't a problem, since I'm a pesca-vegan and all. I ordered the yellowfin tuna, one of their catch-of-the-day, very lightly broiled so that it was still mostly rare (I would have ordered it sashimi-style, my favorite way, but it wasn't on the menu) and completely uncooked in the middle. It was AMAZING. This is why I'd never give up fish. Like I said in my first post (and will eventually be posted on my 'philosophy' page, when I get around to it), fish is way too delicious and healthful, and I don't support mass-fishing, just local.

We took some fun pictures outside the restaurant before we left.


Look at our happy, happy faces. I love the look my youngest sister Lauren is giving the camera. ;-) We were actually having an awesome time, but dad was taking FOREVER to take the picture and being obnoxious about it. ;-P

This wooden sculpture, we decided, is a fisherman, not a pirate. He doesn't look mean enough to be a swarthy pirate; he's just a fisherman/sea-man of some sort who just happens to have a peg-leg and an eyepatch. ;-)

Anyway, I'm here back in the hotel room writing this post. It's late, and I'm going to get some rest for tomorrow (if I can get my little sisters to turn off the television!). Another post from down here in the Keys coming tomorrow. :-)

Thursday, August 4, 2011

Frozen Sandwich Treats and Backyard Chicken Coops

Have you seen my post for Pumpkin-Vanilla Ice-Cream Sandwiches? The "creamy, dreamy," vegan banana "soft-serve" smushed between two chewy, oatie cookies that I lost my heart to:


Well this morning I tried a new flavor variation: Ginger-Pear & Vanilla. I also tried thinner cookies (I thought they were much too thick last time) and a new shape--square, instead of round.

Here's how I made them:

Make sure you have a frozen banana (chunked) in the freezer handy, like you would for any soft-serve recipe (if you haven't already seen those recipes, there's a link above). Before all else, to prepare for the vanilla center, stir together a 1/2 cup of almond milk and 1 1/2 teaspoons of pure vanilla extract. Pour this into ice-cubes in an ice-cube tray and place in the freezer to solidify.
*Note: the amount of vanilla "soft-serve" that this makes is actually more than enough for the three cookie sandwiches. I just delighted in the extra stuff while I was cooking, or I could've just scooped it into a glass and stuck it in the freezer to eat soon after I was finished. If you don't want to have any extra (although I can't think of why you wouldn't--that stuff is delicious!), just lower the amount of milk.

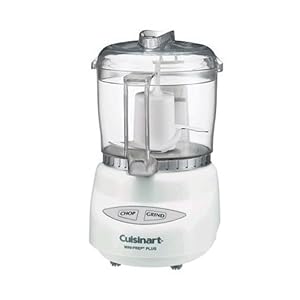
Once you've gotten that out of the way, you can start the cookies. Pre-heat the oven to 350 degrees Fahrenheit. In a food processor of blender, puree one ripe pear, two tablespoons of almond (or other) milk, and a teaspoon of vanilla extract. At this point, you can also add any sweetener desired (like stevia, cane sugar, honey, etc.), but I skipped this; for me, the pear alone is enough sweetness for the cookies, because I don't have much of a sweet tooth and rarely use sweeteners (I usually get it all from fruit).


In a separate bowl, make a flax "egg" by stirring together a tablespoon of flax meal with two tablespoons of water and letting it rest for a few minutes. Then stir in 1/2 cup oats, 1 1/2 teaspoons ground ginger, a pinch of baking powder, and an even smaller pinch of baking soda. Mix the pear blend into the bowl, incorporating the wet with the dry to make your batter. Spoon this into a small baking dish (shallow is better) and spread into a thin (about 1/4 inch?) layer. Then bake at 350 for about 40 minutes. Remove and let cool for fifteen minutes or so, then let chill in the fridge for twenty, and then place in the freezer, leaving it in for at least another twenty, or until they're nice and cool and firm to the touch.

At this point, take out the dish and cut the cookie into six (for three, bar/square sandwiches) even pieces. If you wanted you could also funk things up a bit by cutting them into some other shape, or you could make different-size sandwiches. (Have fun with your food! I know I always do. ;-) ) Put the cookies back into the freezer. Before you use them for the sandwiches, they have to be very cold--if the cookies aren't cold enough, they'll make the filling mushier and your sandwiches will get very messy. Believe me.

Now you're ready to put together your sandwiches! Blend the frozen banana and milk-cubes (if your blender/processor can't handle ice, just leave the cubes out for a minute until they melt up a little) into smooth, creamy goodness. Immediately race to the freezer, grab your cookies, and get to spooning the filling onto half of them, topping each cookie with another to make your sandwiches. Get them into the freezer lickity-split before they start to melt! Leave them in for at least an hour, or until they're nice and solid and don't fall all over the place when you try to pick them up. You want them super cold (but not frozen solid, of course--I don't recommend leaving them in too long).


You can see how the vanilla filling got kind of smushy when I was putting them together. I was trying to get as much on there as possible. I should have cleaned them up a bit for their photoshoot, but I just wanted to eat them with all their yummy creamy center. ;-) I'll remember next time to make sure they come out nice and neat. Despite their sloppy appearance they were delicious, and gone in a flash--you don't have to worry about them melting when eat them! ;-)  Pear, ginger, and vanilla make a great team. And I was right to thin out the cookies--I like the sandwiches better that way; the Pumpkin-Oatmeal batch had too much cookie and not enough filling, and they were kind of hard to bite into, too thick. This way the filling-to-cookie ratio is perfect.


Moving on to another topic that isn't so mouth-watering: I might be getting pet chicks (which, of course, will eventually grow into chickens)! I think it would be so fun to have two downy little chickens to take care of. Especially when they're babies, but when they become full grown chickens as well. I think it'd be interesting to have pet chickens! Of course, I won't be eating the eggs (though my family will), but I'd love to have chickens as pets; I just like the idea of it. It has a kind of a coziness and hominess to it.

Aren't the little chickies just adorable? <333

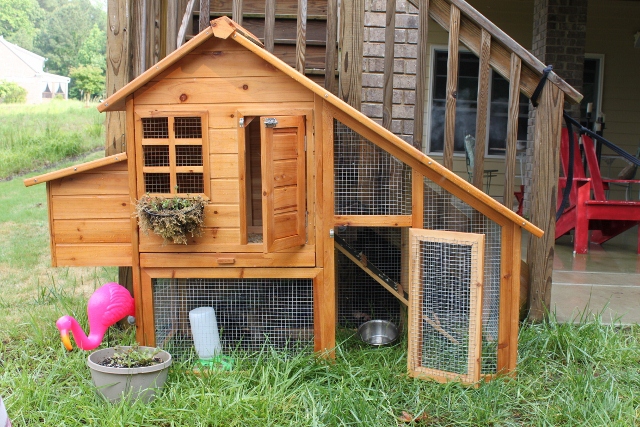
We're going to build a little coop for them in the backyard. It'll have a little closed in area for them to peck around, though I'll let them out in the yard sometimes when I'm there to watch them (especially until we get the fence fixed up; right now there are holes and things, and we need chicken wire to keep out predators). I'm taking full responsibility for these chicks (no way I'd give any to my sisters, anyway!). I'll be constructing their coop with my dear ol' dad. What color should I paint it? Red? Bright green? Blue? Lavender? I can't decide!


I've been researching chickens--breeds, basic care, etc. Australorps, Buff Orpingtons, Brahmas, and a few other breeds are said to make the best pets. As soon as the coop is done, of course, we'll need to actually get the chicks, and I'm not quite sure where we're going to do that yet. If you're reading this and you know something about raising and caring for chickens, I'd love to hear any tips in the comments!

I'm superduper excited!!! :-D


QUESTION:

What do you think of having chickens as pets?

Some people are bird people; some are not. I personally think it's wrong to clip a bird's wings and keep them in a small, confined cage inside a home. I always feel sad when I see them like that. Birds belong in the open air, where they can fly and live as nature intended. With having pet chickens, I won't have to clip their wings, and of course I won't be keeping them inside. They'll be living relatively naturally in my backyard. I'm convinced that they'll be happy there. :-)


Tuesday, August 2, 2011

Recipe-Packed Post

I can't stand lazy days. They're just not for me. I find that I'm much happier when I'm active and productive all day; I feel better when I've gotten lots done. Today was a great day for me. I have all these recipes I need to post, so first order of business: Strawberries n' Cream Oatmeal Pudding.


A few days ago I made this for breakfast. I wanted to try a pudding recipe since I haven't tried many before, and I'd been itching to try CCK's Kozyshack recipe--with my own tweaks, of course. ;-) Using her basic idea, I prepared the pudding the night before, using the fresh strawberries I picked up at the grocery (very ripe, sweet strawberries work the best). First, puree 3/4 cup strawberries, half a serving firm tofu (I used Mori-nu light), 3/4 cup almond (or other) milk, and 2 teaspoons (you can use less, if you want) pure vanilla extract. Stir this mixture into 1/2 cup oats and leave covered in the fridge overnight.


When you're right-n'-ready for your brekkie pudding, take out the oatmeal and pulse a few times in your blender or food processor. Transfer to a small saucepan and cook on the stove on medium-high, covered, for at least twenty minutes, then reduce heat to medium-low and cook for another twenty uncovered, or until you've reached the desired consistency and the pudding has cooked down and sweetened up a little. Enjoy warm or place back in the fridge to chill and enjoy it cold later (both ways are delicious! and the chilled one gets a bit sweeter).


I garnished mine with a few goji berries (but fresh, heart-shaped strawberry slices would've looked so much prettier--I'll be sure to upload a better, more professional photograph when I make this pudding again next in the future--with a better camera and better presentation).

Creamy, pink, delicious goop!


 It was absolutely delicious the morning I had it. This morning, however, I enjoyed one of my favorite breakfast soft-serves--a Peppermint Soft-Serve. Using the basic recipe, I just blended together a frozen banana, 1/4 cup almond milk with 1/2 teaspoon pure peppermint extract stirred in that I chilled for a bit in the freezer in advance, and a large handful of frozen spinach. The Ninja whipped it right up into a smooth, dreamy n' minty delight.

Garnished with a fresh sprig of spearmint from the garden. <3


Look at all that green! This would be perfect for St. Patty's Day, don't you think?


Next recipe on the agenda: Pumpkin-Quinoa Bars!


I'd heard of baking with quinoa while putzing around blogs. I absolutely adore quinoa, though I've only ever had it in savory dishes. I figured it'd made delicious baked goodies as well; why not?

I found a recipe online and altered it to my likes (arguably, improving it). Making the bars single-serving, I prepared 1/4 cup quinoa--using the normal method, bringing it to a boil on the stove with 1/2 cup water and simmering for fifteen minutes covered. Then, I blended half of the quinoa with 1/2 cup of organic pumpkin puree, 1/4 cup water (but maybe almond milk would work better next time?), one teaspoon vanilla extract, and half a box of raisins (I used them as the sweetener, because I like to use fruit for my sweetness--you can also use sweetener or choice, like brown sugar, stevia, honey, agave, etc., though you might have to alter the recipe a bit). I pre-heated the oven to 325 degrees Fahrenheit.


Meanwhile, in a separate bowl, I prepared a flax "egg" by mixing together a tablespoon of water with a tablespoon of flax meal and letting that sit for a few minutes. Then stirred in the spice for the bars (of course, these measurements can be altered to your taste-buds/flavor preferences): a heaping teaspoon of ground cinnamon, scant 1/2 a teaspoon of ground ginger, and 1/4 teaspoon of ground nutmeg. I also added a pinch (about 1/8 teaspoon) of baking powder and an even smaller pinch of baking soda.

Then, I mixed the wet mixture into the bowl, also adding the rest of the quinoa, until all of it was blended well together. I scooped this pumpkin-licious dough into a small glass baking dish (any small oven-safe pan/dish, etc. will do, of course) lined with parchment paper (for super-easy clean-up; some people use tinfoil, but I find that it hinders the baking process), spreading it out into a thin, 1/3 inch layer for my bars. The baking time depends on how thick you make your bars: if you want thinner bars, about the thickness I made mine, bake at 325 degrees Fahrenheit for 40 to 45 minutes. For thicker bars, simply cook longer, and maybe up the temperature to 350 for faster cooking (but I warn you--they might end up being uncooked a little on the inside).

When they were done, I took them out to let them cool on the counter for ten minutes, then I transferred them to the refrigerator to chill for another twenty. At this point, it would probably be best to let the bars set overnight to give them a chance to firm and sweeten up, but since I was so eager to try my Pumpkin-Quinoa Bars, I used the quicker option: I popped them in the freezer for another twenty-or-so minutes. Then, when I just couldn't wait any longer, out they came, onto the plate.

Because of my impatience, the bars had a bit of a strange texture--chewy on the outside and kind of soft on the inside. Next time I use this recipe, I'll be sure to prepare them the day before so they can sit in the refrigerator to properly set and firm up.
And so I discovered another wonderful way to use quinoa! :-)

Another post is coming up soon--I just needed this one to get out some built-up recipes. I have a ton built up. I've been busy busy busy in the kitchen lately, ;-)

Sunday, July 31, 2011

Testing Out My New Magic Bullet


IT CAME!!!

Several days ago--Tuesday morning--I finally recieved the package: the Magic Bullet twenty-five piece set that I ordered on Ebay (sorry I haven't been doing posts regularly, but I'm still working on starting up this blog--more on how my posts will be in a future post about that). Of course, I was so excited that I immediately tore open the box and, as quickly as I possibly could, removed all the pieces and parts from their annoying individual packaging (Way to NOT be eco-friendly, stupid big company, using WAY more plastic and cardboard than needed.) and set it all up on the countertop. The set came with several cups with attachable lids, half of them half-sized glasses and half of them regular-sized, a very small cup-sized top, a two-cup top, a small(ish) blender top, and an extra blade for whipping.
Right away, I got to testing my new Bullet (without even glancing at the instruction booklet, of course). And what better way to test it than with a delicious, creamy green-mocha banana breakfast soft-serve? I snatched a frozen, chunked banana from the freezer and grabbed some chilled almond milk, frozen spinach, espresso powder (love that stuff!), vanilla extract, and cinnamon. In the Bullet it went; I used one of the regular glass-sized attachments, which looked like the perfect size. It took me a minute to realize that I had to first put the ingredients in the cup, then screw the blade on nice and tight, and then screw it on the base (yes, I'm a little slow; but what can you expect? I am, after all, a blonde ;-) ). Then--in great, wide-eyed anticipation--I pushed down on the cup, locking it into place. With a noisy whir, the blade fired up. I gave it a moment to start working.

Agonizing disappointment as I realized that it wasn't going much of anywhere and that the contents weren't really getting blended, even though it sounded like the blade was spinning furiously. Horrified, I let the blender stop and took it out and stirred it. I desperately, desperately wanted it to work like I dreamed it would. But no matter how much I shook and stirred the ingredients, the silly blender just couldn't do the job and I ended up having to add a lot more almond milk before the frustrating thing would blend it up. My shake was warmer and thinner than usual that morning.
I was extremely crestfallen.

See that, on my face? That's disappointment right there. (Oh, and the little red dots. That's facial blemishes and stuff. Ignore those, if possible (-; ).


The Magic Bullet definitely doesn't live up to its hype. I suppose it works alright for very easy, thin liquids, but the motor just isn't very strong and it just isn't heavy-duty enough; definitely not an adequate replacement for a food processor. The biggest problem I have with the Bullet is that the food just sits around the blade; it just spins without actually blending and incorporating the food, which just immediately ends up on the sides of the bottom of the blender, away from the blade. It's annoying that you have to keep scooping everything back onto the blade every five seconds. I am NOT satisfied with my product. "Blends anything in just ten seconds" my butt. I'm much too lazy to return the box, though. Heh.

I'm going with a good ol' mini food processor (as soon as I can get some money for it, after I spent a whopping $60 on that good-for-nothing Magic Bullet), probably the same Cuisinart that I had in the first place--and it was much cheaper to buy than the Bullet anyway (at least half the price, I think)! It just goes to show you that some products are just over-glorified, while simple things can be very good-quality.


A piece of kitchen equipment that I DO like is the Ninja blender. Even though it's too big to function well for most of my stuff, because I only really make single-servings, it works excellent: it does ice (say, like, for delicious "soft-serves" and "voluminous ice-cream;" I'm currently using it for them in the mornings, and it does a great job at making it really creamy (-; ) like a pro and processes pretty much anything effortlessly. And you can get it at Walmart for a mere eighty dollars (or something to that effect). I just wish they had a mini-Ninja! That would be perfect for me.


QUESTION:

If you own the Magic Bullet, Cusinart Processor, or Ninja, how does it work for you?
What's your favorite piece of kitchen equipment? Do you have one?

Sunday, July 24, 2011

Musings of a Newbie Blogger--A Brief Post


I'm new when it comes to blogging; I only began a few days ago. But, so far, I've come to know a few things.


Blogging takes time and dedication. You have to fully enjoy what you're doing (of course--why else have a blog?)--it takes at least a little time every day, more as you're first getting started. Even though things start out slow and it often seems like the whole thing is just going nowhere, it's important to remember that these things take time. I hope that, with work, my blog will eventually grow into what I'd like it to be. And when it does, I can feel good about what I've done because of the effort I've put into it. I now have even more respect for all the other bloggers out there who have put so much time and dedication into their blogs and have so much passion.

 
Things I need to work on:

1. Food Presentation & Photography
2. Creativity in the Kitchen
3. Writing and Journaling Skills


For me, one of the most difficult parts of blogging is not knowing how I sound to others. I'm always afraid that I sound silly or foolish, wondering if I come off as trying too hard. No matter how many times I re-read what I type, I just can't tell what I'll seem like to others. Sometimes I go over a post and wish I'd written it another way or not written it at all. What if people just think my blog is stupid, or not original enough? But I really do love blogging so far, and want to continue with it.


A QUESTION FOR OTHER BLOGGERS OUT THERE:

Do you ever get feelings like this about your posts? Should I even care too much about what others will think of me and my blog? I'd love to hear any tips and advice. :-)